
2. Real World LaTeX #
Use the document skeleton from Chapter 1. Load the packages mentioned in each section in its preamble; put the remaining examples in the body.
2.1 Line Breaking and Page Breaking #
LaTeX normally justifies paragraphs by choosing word spacing and line breaks for the entire paragraph. It also hyphenates words according to the active language.
| Command | Effect |
|---|---|
A blank line or \par |
End a paragraph. |
\\ or \newline |
Break a line within the current paragraph. |
\\[6pt] |
Break a line and add extra space. |
\\* |
Break a line but disallow a page break there. |
\newpage |
Start a new page. |
\clearpage |
Place pending floats, then start a new page. |
\linebreak[n], \pagebreak[n] |
Suggest a break with strength n from 0 to 4. |
\nolinebreak[n], \nopagebreak[n] |
Discourage a break with strength n. |
Use forced breaks for a specific reason, such as an address or a deliberate page boundary. They are not substitutes for paragraph structure.
An Overfull \hbox warning means a line extends beyond its box. Find the offending text, URL, equation, or table and fix that item. The draft class option marks overfull lines. \sloppy permits looser spacing, but applying it everywhere can make the whole document look worse.
Hyphenation #
Provide additional word-break hints when necessary:
% Preamble
\hyphenation{data-base data-bases}
In the body, data\-base allows a discretionary hyphen at that location. \mbox{a short phrase} keeps its contents together. Use it sparingly: an unbreakable phrase can itself cause an overfull line.
2.2 Ready-Made Strings #
\today prints the date; \TeX, \LaTeX, and \LaTeXe print the corresponding logos. Remember the empty group before a following space:
Prepared with \LaTeX{} on \today.
2.3 Dashes and Hyphens #
Use each mark for its intended purpose:
A well-known result.
Read pages 13--67.
The answer---after checking---is yes.
The difference is \(7-4=3\).
One hyphen joins words, two produce an en-dash for ranges, and three produce an em-dash. In mathematics, - produces a mathematical minus sign.
2.4 Slash #
A typed / is suitable for expressions such as “input/output”. \slash permits a line break after the slash, as in input\slash output. Use \url from hyperref for addresses rather than manually managing their break points.
2.5 Ellipsis #
Use \ldots{} in text:
One, two, three, \ldots{} and many more.
Mathematical dots depend on context and are covered in Chapter 3.
2.6 Ligatures #
Fonts may combine letter pairs such as “fi” or “ff” into a single glyph. This is normal typesetting. In the occasional case where a ligature crosses a meaningful boundary, an empty group can separate the letters, as in shelf{}ful. Font-specific ligature settings are discussed in Chapter 7.
2.7 Abstract #
The abstract environment gives an article a short summary:
\begin{abstract}
We compare two methods and describe the conditions under which
each method is useful.
\end{abstract}
Place it after \maketitle and before the main sections. Its availability and appearance depend on the document class.
2.8 International Language Support #
Language support involves more than entering accented letters: it also controls hyphenation, generated names such as “Contents”, and punctuation conventions.
With XeLaTeX or LuaLaTeX, save the source as UTF-8 and use fonts containing the required characters. This complete example switches between English and German:
\documentclass{article}
\usepackage{fontspec}
\usepackage{polyglossia}
\setdefaultlanguage{english}
\setotherlanguage{german}
\tracinglostchars=3

\begin{document}
Today is \today.

\begin{german}
Heute ist \today. Grüße aus Köln!
\end{german}
\end{document}
\tracinglostchars=3 makes missing glyphs an error, so that they are harder to overlook. You can also type accents with commands, such as \'e, \"o, and \c{c}.
For right-to-left scripts, select the language and a suitable font through the language package. Changing alignment alone does not establish the correct writing direction.
CJK typography needs additional handling for line breaks, punctuation, and fonts. With XeLaTeX, the xeCJK package provides this support. Here is a complete Chinese example using a font supplied with TeX Live:
\documentclass{article}
\usepackage{xeCJK}
\setCJKmainfont{FandolSong-Regular.otf}

\begin{document}
English and 中文 can appear in the same document.
\end{document}
For a full Chinese article, the ctexart class is a convenient alternative, as shown in the Chinese beginner’s guide. Do not expect one CJK font or one configuration to cover every language’s requirements.
2.9 Simple Commands #
A named command avoids repeating a phrase and lets you change it consistently:
% Preamble
\NewDocumentCommand{\projectname}{}{Orion}

% Body
The \projectname{} project is ready.
The empty second argument declares that this command takes no arguments. \NewDocumentCommand reports an error if the name already exists; use \RenewDocumentCommand only when you intend to redefine an existing command. Chapter 7 introduces parameters and more elaborate definitions.
2.10 The Space Between Words #
LaTeX normally allows extra space after sentence-ending punctuation. Give it a hint when a period is part of an abbreviation:
See Fig.\ 2 for the result.
Prof.~Smith wrote the report.
This is written in ASCII\@. A new sentence follows.
\ inserts an ordinary word space. ~ inserts a non-breaking space. \@ before the period tells LaTeX that a sentence ends after a capital letter. \frenchspacing disables the extra sentence spacing throughout its scope.
2.11 Titles, Chapters, and Sections #
Set title information in the preamble and print it with \maketitle in the body:
% Preamble
\title{An Experiment}
\author{Alex Writer \and Sam Reader}
\date{} % Leave the date out

% Body
\maketitle
\tableofcontents
\section{Introduction}
\subsection{Background}
\subsubsection{Earlier Work}
report and book also provide \chapter. Below \subsubsection are \paragraph and \subparagraph; these are headings, not commands for ordinary paragraph breaks.
\section*{Acknowledgements} creates an unnumbered heading and normally omits it from the contents. To add it manually:
\section*{Acknowledgements}
\addcontentsline{toc}{section}{Acknowledgements}
An optional short title, such as \section[Short Title]{A Much Longer Title}, is used in the contents and running headings. \appendix changes subsequent section or chapter numbering to appendix style. In book, \frontmatter, \mainmatter, and \backmatter organise the major parts.
2.12 Cross References #
Put a label after the command that creates the number, then refer to its name:
\section{Method}\label{sec:method}
The method is described here.

See Section~\ref{sec:method} on page~\pageref{sec:method}.
Use unique labels with meaningful prefixes such as sec:, fig:, tab:, and eq:. For a figure or table, the label must follow \caption. References may need another compilation pass; ?? also appears when a label is misspelled or absent.
2.13 Footnotes #
The data were collected in June.\footnote{All dates use the local timezone.}
Place the footnote command next to the relevant text, without an unwanted space before it. LaTeX supplies the mark and positions the note.
2.14 Lists #
Use itemize for bullets, enumerate for numbering, and description for named entries:
\begin{enumerate}
  \item Prepare the data.
  \item Run the experiment.
  \begin{itemize}
    \item Record the inputs.
    \item Save the results.
  \end{itemize}
\end{enumerate}

\begin{description}
  \item[Input] Values supplied to the experiment.
  \item[Output] Values produced by the experiment.
\end{description}
Lists may be nested, but deep nesting is difficult to read. Use \item for each entry instead of typing bullets or numbers yourself.
2.15 Non-Justified Text #
Use ragged2e for alignment with improved line breaking:
% Preamble
\usepackage{ragged2e}

% Body
\begin{FlushLeft}
This paragraph has a ragged right edge.
\end{FlushLeft}

\begin{Center}
A centred line.
\end{Center}
FlushRight gives a ragged left edge. The declarations \RaggedRight, \RaggedLeft, and \Centering are useful inside a group or another environment. End a paragraph before closing the group so its paragraph settings still apply.
2.16 Quotations #
Load csquotes and let it manage opening, closing, and nested quotation marks:
% Preamble
\usepackage[autostyle]{csquotes}

% Body
\enquote{Press the \enquote{x} key.}

\begin{displayquote}
A longer quotation is set apart from the surrounding paragraph.
\end{displayquote}
\textquote[attribution]{text} adds attribution to an inline quotation. \blockquote chooses inline or displayed treatment according to its threshold. With language support, \foreignquote{german}{...} switches to the appropriate foreign quotation style.
For several quoted paragraphs, quotation gives indented paragraphs; quote is useful for shorter passages. The verse environment supports poetry, with \\ ending a line and an empty line ending a stanza.
2.17 Code Listings #
Verbatim text #
Use \verb|a_b % literal| for a short literal fragment. Pick a delimiter that does not appear in the fragment. For several lines, load \usepackage{verbatim} in the preamble and use:
\begin{verbatim}
for value in values:
    print(value)
\end{verbatim}
Verbatim content does not interpret normal LaTeX commands. It usually cannot be placed directly in another command’s argument.
Syntax highlighting #
The listings package highlights supported languages without an external highlighter:
% Preamble
\usepackage{listings}
\lstset{
  basicstyle=\ttfamily\small,
  numbers=left,
  breaklines=true,
  showstringspaces=false
}

% Body
\begin{lstlisting}[language=Python,caption={A short loop}]
for value in range(3):
    print(value)
\end{lstlisting}
Use \lstinline|code| for inline code or \lstinputlisting[language=Python]{analysis.py} for a file uploaded to the project. Options such as firstline, lastline, keywordstyle, commentstyle, and frame control presentation.
Another option is minted, which uses an external highlighting tool. Its basic interface is \begin{minted}{python} ... \end{minted} and \inputminted{python}{analysis.py}. It needs the external tools and execution permissions required by the installed version. Check the compilation environment before choosing it; listings is simpler when those tools are unavailable.
2.18 Tables #
Basic tables #
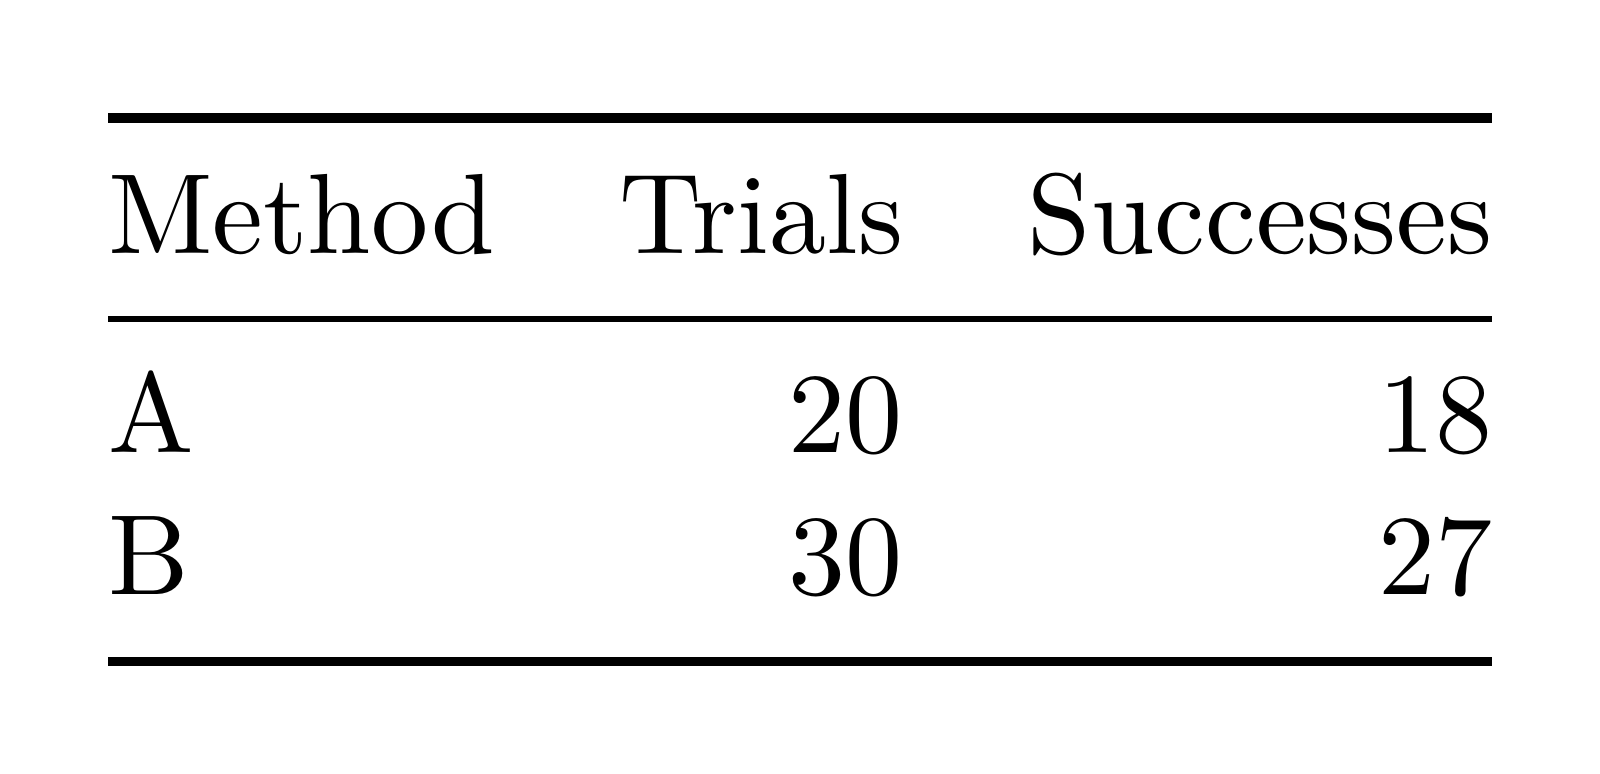
The tabular environment aligns cells. & separates columns; \\ ends rows. Load booktabs for well-spaced horizontal rules:
% Preamble
\usepackage{booktabs}

% Body
\begin{tabular}{@{}lrr@{}}
  \toprule
  Method & Trials & Successes \\
  \midrule
  A & 20 & 18 \\
  B & 30 & 27 \\
  \bottomrule
\end{tabular}
| Column syntax | Meaning |
|---|---|
l, c, r |
Left, centre, right; text does not wrap. |
p{4cm} |
A fixed-width paragraph column, aligned at the top. |
m{4cm}, b{4cm} |
Vertically centred or bottom-aligned paragraph columns; require array. |
@{} |
Remove the inter-column padding at that position. |
>{...}, <{...} |
Insert formatting before or after a column; require array. |
booktabs recommends avoiding vertical and double rules in data tables. Put units in column headings and keep precision consistent. Decimal alignment is covered in Chapter 3.
Merge columns with \multicolumn{2}{c}{Results} and draw a partial rule with \cmidrule(lr){2-3}. The multirow package supplies \multirow{2}{*}{Group A}; leave the covered cells empty in subsequent rows.
For reusable column formatting:
% Preamble
\usepackage{array}
\newcolumntype{P}[1]{>{\raggedright\arraybackslash}p{#1}}
Then \begin{tabular}{lP{6cm}} creates a normal first column and a wrapping second column.
Tables across pages #
tabular stays on one page. Use longtable for a table that can break between rows:
% Preamble
\usepackage{longtable}
\usepackage{booktabs}

% Body
\begin{longtable}{@{}lr@{}}
  \caption{Results}\label{tab:results}\\
  \toprule
  Method & Score \\
  \midrule
  \endfirsthead

  \toprule
  Method & Score (continued) \\
  \midrule
  \endhead

  \midrule
  \multicolumn{2}{r}{Continued on next page}\\
  \endfoot

  \bottomrule
  \endlastfoot

  A & 18 \\
  B & 27 \\
  C & 25 \\
\end{longtable}
Add rows to extend the table. \endfirsthead, \endhead, \endfoot, and \endlastfoot separate its first-page header, repeated header, repeated footer, and final footer. An individual tall row cannot split across pages. Do not put a longtable inside a table float.
2.19 Including Graphics and Images #
Load graphicx. Upload plot.pdf to the project, then include it:
\includegraphics[width=0.7\linewidth]{plot.pdf}
PDF is suitable for vector plots; PNG and JPEG are suitable for raster images. Set one dimension to preserve the aspect ratio, or use keepaspectratio when setting both. Other options include height, scale, angle, and trim=left bottom right top,clip.
For images stored in a subfolder:
% Preamble
\usepackage{graphicx}
\graphicspath{{figures/}}
\linewidth is the available width in the current environment; \textwidth is the document’s text-block width. They can differ inside lists, columns, and minipages.
2.20 Floating Bodies #
A float allows a figure or table to move so that surrounding text can fill the page. The container does not create its contents: figure usually contains \includegraphics; table usually contains tabular.
After uploading plot.pdf and loading graphicx:
\begin{figure}[htbp]
  \centering
  \includegraphics[width=0.7\linewidth]{plot.pdf}
  \caption[Results]{Results from the first experiment.}
  \label{fig:results}
\end{figure}

See Figure~\ref{fig:results}.
| Option | Permitted location or effect |
|---|---|
h |
Here, if it fits. |
t |
Top of a page. |
b |
Bottom of a page. |
p |
A page of floats. |
! |
Relax several internal placement restrictions. |
These are permissions, not a guaranteed position or a user-specified priority order. A float that cannot fit may delay later floats of the same type. Allow several placements before trying to force one location.
\listoffigures and \listoftables collect captions. The optional short caption supplies their text. \clearpage empties pending float queues; \cleardoublepage also advances to a right-hand page when required by the layout.
For a new kind of float, load newfloat and define it in the preamble:
\DeclareFloatingEnvironment[
  name=Algorithm,
  listname={List of Algorithms}
]{algorithm}
This creates an algorithm environment with its own captions and numbering.
2.21 Big Projects #
Split a project into files once it becomes difficult to navigate:
% Preamble of a book or report
\includeonly{chapters/introduction,chapters/results}

% Body
\include{chapters/introduction}
\include{chapters/method}
\include{chapters/results}
\include starts and ends a page and records separate auxiliary information. \includeonly limits which included files are processed; compile the full document first if you want references to omitted chapters to be available.
\input{sections/background} inserts a file without forcing page breaks and is useful for smaller sections or shared definitions. Included files contain fragments, not another \documentclass or document environment.
The syntonly package with \syntaxonly checks syntax without producing pages. Regular compilation is still necessary to check layout and references.